Today I
am going to write about a new and very powerful feature introduced in OIM
11gR2PS2 which is Access Policy Harvesting. Though its late but better late
than ever :)
Well the oracle document has covered the part of how to do it, but the doc doesn't much explain as to what it is. Below is the link to original Oracle Doc-:
Well the oracle document has covered the part of how to do it, but the doc doesn't much explain as to what it is. Below is the link to original Oracle Doc-:
Access Policy Harvesting
Lets start with a use case. An organization decides to implement Identity Management and Role based access control using OIM 11gR2PS2. As a developer we will first install/develop connectors for provisioning, de-provisioning and reconciliation. You will create Roles and access policies to get the RBAC working. Now arises the problem with the existing accounts. Yes definitely, we can reconcile them but the accounts won't be linked with the access policies. So for the existing accounts, as they weren't created by the access policy, can't be revoked or modified by the access policy. Lets understand more with an example.
Lets say there is role "Sales Supervisor" in OIM, tied to access policy "Sales Supervisor". The access policy provides following application accesses.
1) Application A - entitlement SALE_SUP.
2) Application B - entitlement SALES_SUPERVISOR.
There is a user X having both the above application accesses. Now for this user you shouldn't just assign the role in OIM as after assigning the role the access policy will try to create the accounts and as the accounts already exist the provisioning will fail. Else we can reconcile the accounts first then assign the Role but this will not actually link the accounts with your access policy and then comes a much bigger risk. What if the user changes his/her job and goes to finance, in this case user will need a role something like "Finance Supervisor". Now we will remove the role "Sales Supervisor" which should remove all the user's Sales related access, but it won't as the accounts weren't linked with the role/access policy.
To overcome this there are workarounds like have the CREATE_USER process task call the tcCompelteTask adapter. Assign the role to the user, access policy will provision the accounts successfully. Replace the tcCompelteTask with the actual adapter and get it working. Else we can also modify the DB tables to manually retrofit the access policy key for the reconciled accounts and so on. But being workarounds they impose risk and chances of error.
Now is the time for introduction of "Access Policy Harvesting". With this new feature you can actually link the reconciled accounts with the existing access policies and future changes to the accounts will be managed by the access policy changes. Below are steps (same as the Oracle Docs) to enable "Access Policy Harvesting"
1) Set the values of XL.AllowAPHarvesting and XL.AllowAPBasedMultipleAccountProvisioning system properties to TRUE
2) Set the retrofit flag to ON for the policy to be linked by selecting Retrofit Access Policy.
3) Populate the ITResource field in access policy defaults. (Make sure the IT resource attribute is populated in the access policy).
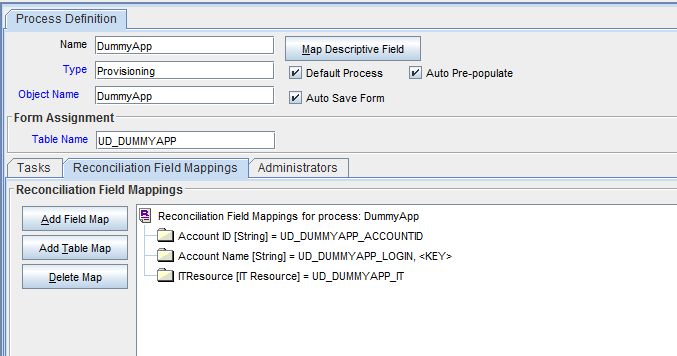
4) Designate a field on the process form (for all applications part of the access policy) as the discriminator field and set the value of the Account Discriminator property to True. Then, populate the access policy defaults for the account discriminator field. Well if you don't have the multiple account provisioning enabled then just for the sake of simplicity set the property Account Discriminator to true for IT resource field. If you have multiple account/per user for an application then you must be knowing which attribute can discriminates the accounts and you can set the property to true for it.
The above four steps will enable Access Policy Harvesting. Below should be the sequence to do the harvesting.
1) Reconcile all the application accounts for the user(s) at least the ones which are part of your access policy.
2) Verify if all the accounts are linked to user(s).
3) Assign the corresponding role(s) to the user(s).
4) Run the evaluate policy job.
5) You can monitor the oim_server.out file which will print that the harvesting is happening, or if at all there are any errors.
Feel free to ask any questions in the comments
Lets start with a use case. An organization decides to implement Identity Management and Role based access control using OIM 11gR2PS2. As a developer we will first install/develop connectors for provisioning, de-provisioning and reconciliation. You will create Roles and access policies to get the RBAC working. Now arises the problem with the existing accounts. Yes definitely, we can reconcile them but the accounts won't be linked with the access policies. So for the existing accounts, as they weren't created by the access policy, can't be revoked or modified by the access policy. Lets understand more with an example.
Lets say there is role "Sales Supervisor" in OIM, tied to access policy "Sales Supervisor". The access policy provides following application accesses.
1) Application A - entitlement SALE_SUP.
2) Application B - entitlement SALES_SUPERVISOR.
There is a user X having both the above application accesses. Now for this user you shouldn't just assign the role in OIM as after assigning the role the access policy will try to create the accounts and as the accounts already exist the provisioning will fail. Else we can reconcile the accounts first then assign the Role but this will not actually link the accounts with your access policy and then comes a much bigger risk. What if the user changes his/her job and goes to finance, in this case user will need a role something like "Finance Supervisor". Now we will remove the role "Sales Supervisor" which should remove all the user's Sales related access, but it won't as the accounts weren't linked with the role/access policy.
To overcome this there are workarounds like have the CREATE_USER process task call the tcCompelteTask adapter. Assign the role to the user, access policy will provision the accounts successfully. Replace the tcCompelteTask with the actual adapter and get it working. Else we can also modify the DB tables to manually retrofit the access policy key for the reconciled accounts and so on. But being workarounds they impose risk and chances of error.
Now is the time for introduction of "Access Policy Harvesting". With this new feature you can actually link the reconciled accounts with the existing access policies and future changes to the accounts will be managed by the access policy changes. Below are steps (same as the Oracle Docs) to enable "Access Policy Harvesting"
1) Set the values of XL.AllowAPHarvesting and XL.AllowAPBasedMultipleAccountProvisioning system properties to TRUE
2) Set the retrofit flag to ON for the policy to be linked by selecting Retrofit Access Policy.
3) Populate the ITResource field in access policy defaults. (Make sure the IT resource attribute is populated in the access policy).
4) Designate a field on the process form (for all applications part of the access policy) as the discriminator field and set the value of the Account Discriminator property to True. Then, populate the access policy defaults for the account discriminator field. Well if you don't have the multiple account provisioning enabled then just for the sake of simplicity set the property Account Discriminator to true for IT resource field. If you have multiple account/per user for an application then you must be knowing which attribute can discriminates the accounts and you can set the property to true for it.
The above four steps will enable Access Policy Harvesting. Below should be the sequence to do the harvesting.
1) Reconcile all the application accounts for the user(s) at least the ones which are part of your access policy.
2) Verify if all the accounts are linked to user(s).
3) Assign the corresponding role(s) to the user(s).
4) Run the evaluate policy job.
5) You can monitor the oim_server.out file which will print that the harvesting is happening, or if at all there are any errors.
Feel free to ask any questions in the comments
-gaurav